Pages

Showing posts with label Self drafted pattern. Show all posts

Monday, August 17, 2015

Safari shirt

A week before we went on holiday at the end of May I decided I wanted another lightweight sleeved shirt to help protect my easily sunburned skin. So I pulled out my trusty self drafted shirt pattern. First made here. And then made again here.

It's actually missing a button at the bottom. 
(It seems I can sew a shirt, but not securely attach a button!)

A little collar to help keep the sun off. 


Simple cuffs and hem.

 Another easy wear, easy travel, shirt for my wardrobe.

Wednesday, March 13, 2013

Dressed up in Blue

I wore my new Blue Dress to work last week.  It was lovely to wear and I received some great compliments on it.


 The bodice isn't lopsided, I am..!  I've since tut-tutted to my photographer that it is his job to notice how the clothes are sitting before taking photos!  My shoulder is still a bit sloped from the operation and I think I was also subconsciously pulling the sleeve down a bit to cover the scar.  But I can assure you that the bodice itself is not lopsided!

Overall I'm pretty happy with the dress and only wish I'd finished it before the end of summer!

Next projects are the Burda jacket for MH and a self drafted tunic for me.

Saturday, March 2, 2013

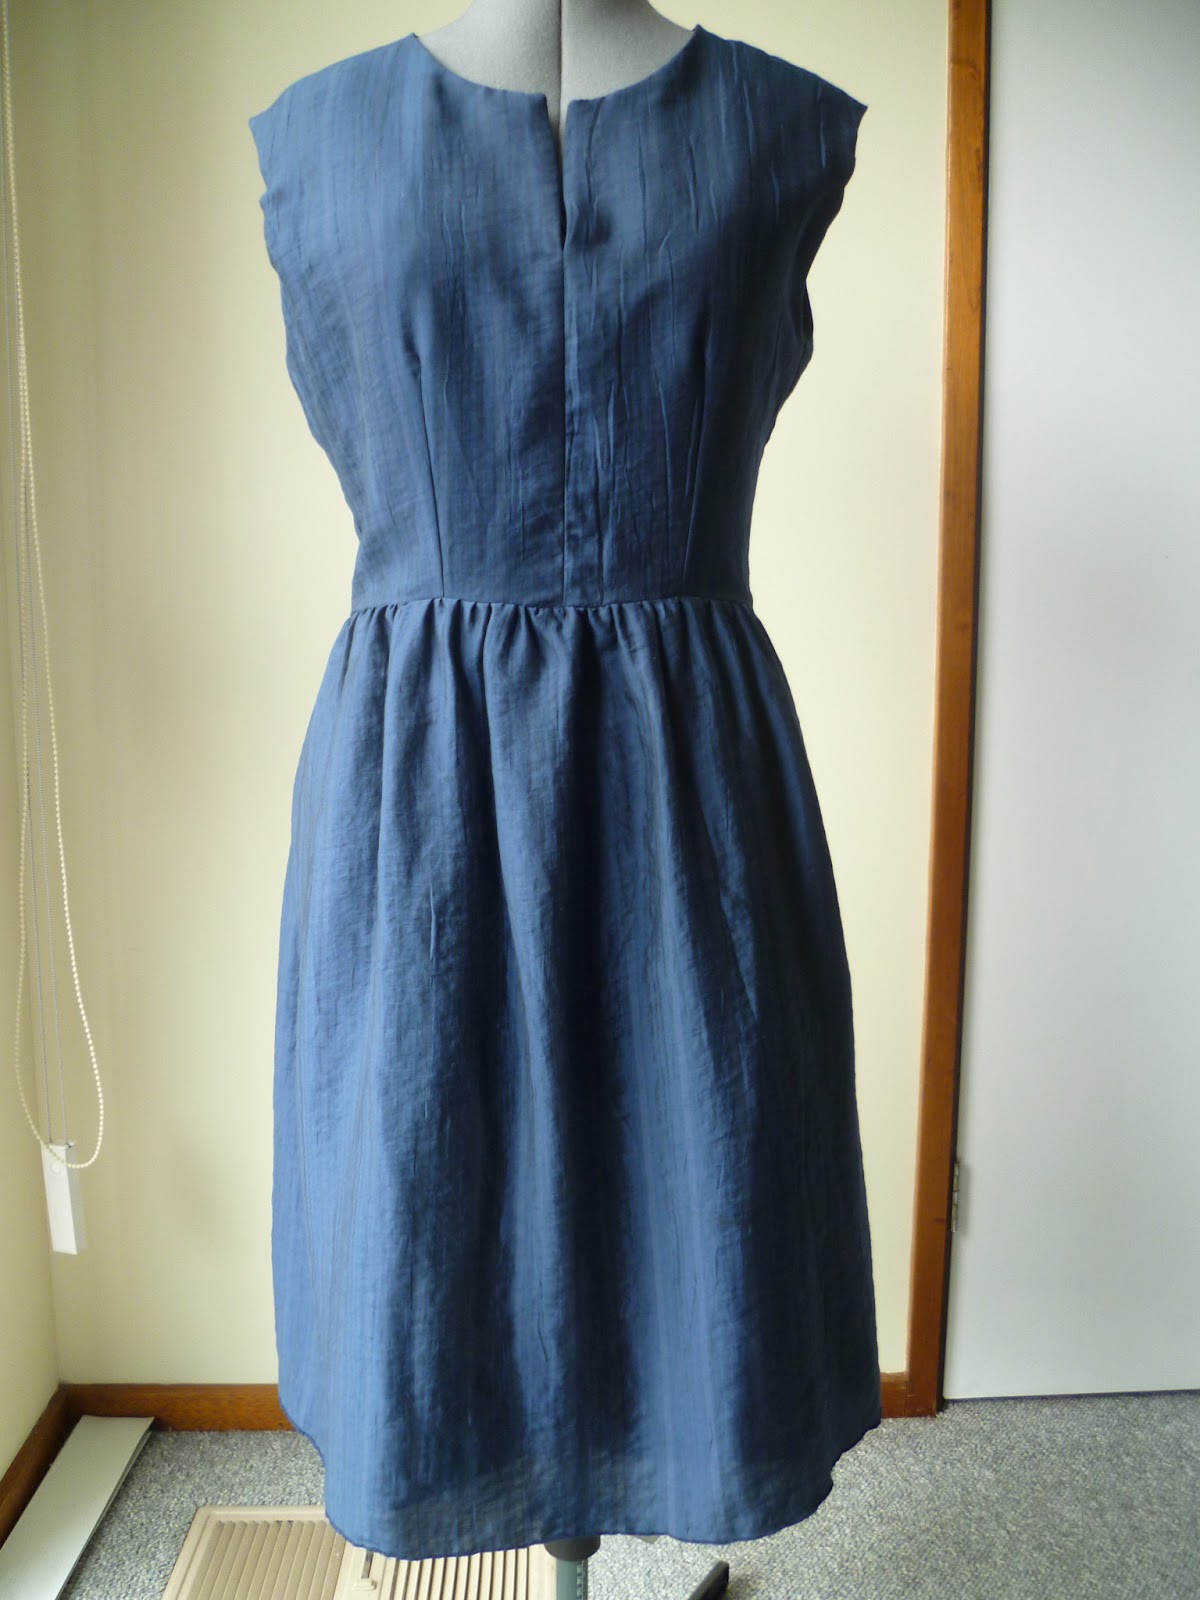
Finished! Blue Dress

Wow, what a marathon!  Some of you may remember eons ago I started a Blue Dress.  A self drafted pattern for a dress that would be appropriate to wear to work in an office.  I started it just a week before my shoulder surgery last year with high hopes of finishing it within a week.  Hmm, that didn't quite happen (what an understatement!).

But at last, here it is.  Four months late, but with a very valid excuse of shoulder surgery and subsequent relapse (with accompanying talk of a possible second operation - sulk).

 The bodice ended up a little bit too long, so the dress has a slight 1980s drop waist.  
I have the perfect belt to help hide that though!

 Front view (with belt!)
I only overcast the hem, rather than a turned up hem.  I'm not sure how that will hold up in the wash so I may end up hemming it later.

 Back view, invisible zip at centre back.

Front facing.  
I put interfacing between facing and fabric, but I'm wondering if it might still be too flimsy to stay upright as the fabric is quite thin.

 Facing and lining.  The lining is a plain black cotton.  
I've made a light summer dress just in time for the weather to turn grey, cold and a bit miserable!

The skirt lining is pleated rather than gathered like the main skirt.

Facings on the back neck.

Overall I'm quite happy with this dress and if I don't get wear out of it before summer ends maybe I can wear it with a shirt and tights for winter?

Details
Fabric:  $12.99/m from Lincraft, Melbourne City.
Notions:  Navy blue invisible zip, navy blue thread
Pattern:  Self drafted 'Blue Dress'
Total cost:  Around $20
Did I learn anything new:  No, but I had to search my memory for how to sew the right angle when joining the facing and lining on the front bodice detail.
Would I make it again:  Yes, but I'd shorten the bodice and probably make a different skirt.

Wednesday, January 23, 2013

Seasonally inappropriate sewing

I could have also titled this post 'Getting Well Part 3' - yes, another month another operation in our little household.  This time it was my husband, he is in pain, but recovering.  And I swear that 2013 will be a much better health year for us than 2012 was! (I count this operation as being needed from 2012, and therefore nothing to do with 2013!). 

Having to do increased household and nursing duties has reduced my time for sewing though.  So I only have one small finished item to show this week.

This reversible double sided dog coat was on my cutting table last April when I had my accident so Tansy didn't have it in time for last winter, but she will be all set for walks on Canberra's icy winter mornings this year (though in the summer heat it is hard to believe those days are only a few short months away).  This coat a followup from the coat I made her last year. 


 The basic pattern - cut centre back on the fold (the straight line at the bottom of the photo).  
Tansy is an over sized (not overweight) Australian Silky Terrier.  She weighs around 8kg.
This pattern piece measures:
36cm along centre back length from neck to tail
27cm around her side from centre back to centre tummy, this includes ease for the Velcro fastening
14.5cm torso, from the back of her front legs to the front of her back legs.

This pattern does not include any seam or hem allowance as I used non-fraying polar fleece for Tansy's first coat.  If you want to make a double layer coat, or are using a fabric that might fray, don't forget to add seam allowance.

 One side of the coat.  I know putting a dog in leopard print is a bit naff, but I couldn't help myself - when I saw the fabric I just had to buy it...!
If you want to make a double sided coat, sew the right sides of the fabric together except for part of the neck area (the curve at the bottom of the photo).  Pull the coat right side out through the unsewn neck area, then stitch the neck area closed.  Add Velcro (or your preferred fastener) and you're done!

 
 Other side of the coat, blue polar fleece.  Because I have used Velcro as the fastener the coat is fully reversible.

 I'm sure the RSPCA would be knocking at my door if I tried to get Tansy to model a thick double sided coat on a hot summer day, so her toy 'Emu' offered her services. 

Tuesday, October 23, 2012

Beginning a Blue Dress

I've decided to move on to a new dress (one that I have enough fabric for!), so have started the Blue Dress.  (Yes, in keeping with my imaginative titles, this one is, you guessed it, a dress made from blue fabric!)

 Technology is a funny thing - I used the same camera in the same location to take these three photos and the fabric colour looks completely different in all of them!  This photo is far too pale, though it does show the lines and slight texture in the fabric.

  Sketch with fabric swatch (where the fabric looks darker than it really is!).  
A fitted bodice, with an open neckline, a gathered skirt and a back zip.

I cut the bodice pieces today.  This photo shows the fabric closest to the colour in real life (dark navy blue).
 The fabric is almost 150cm wide, so I'm going to cut a full width of fabric for the skirt and gather it at the waist.  I'm a pear shape, so I'll see how I go with that much fabric gathered above my hips.  If it makes me look too wide around the hips I'll recut the skirt into a trapezium to reduce the fabric up top.

I won't be pushing myself to finish this dress quickly, but I am hoping to finish it before I head off to hospital for my shoulder surgery next week.  I'll keep you posted!

Thursday, October 11, 2012

Silk Dress Progress

I've made some progress on what I call the 'Hong Kong Silk Dress' (creatively named because I was planning to use silk fabric bought in Hong Kong to make a dress!).  This is the dress that I was pattern making from a picture of a 1940s McCall 7285.

I drafted the initial pattern and then made a toile from a second hand bedsheet.  Being an old bedsheet, the fabric is quite thin, so I'm posting a photo of the toile without me in it!

 Apologies for the dim lighting - I opened the blinds and turned on the lights, but it is a very cold and gloomy day here in Canberra (what happened to Spring?!).
I changed the gathering detail above the bust to a box pleat.  Mostly because I was feeling lazy.. (will I regret that I wonder?).  My husband and I both think this looks a little too much like a nurse uniform, though I think that is more because it is white more than anything else.

 Since making the toile I've adjusted the pattern.  I've gained a bit of weight since my accident, so I had to make it all a bit bigger as well as a couple of adjustments to turn the pattern into more of the style I wanted.  I'll have to forage through my cupboard to find some more fabric that can be used for another toile so I can check all my adjustments.

In the meantime though, here is the lovely fabric I was hoping to use for the dress.  Alas, the fabric width is quite narrow, and with my expanding hips there isn't enough fabric for a dress.  I even changed the pattern to have a side zip, to take advantage of the existing side seams to save a couple of centimetres of fabric from not needing to insert a back seam with zip, but I just can't squeeze the last couple of centimetres needed for the dress.  So close, yet so far.

So now I have a dilemma - what fabric will I use instead?  Or will I save the pattern and fabric for when I can be more active and lose the weight I have recently gained?

I thought of using this fabric instead.  I bought it super cheap at The Remnant Warehouse when we were in Sydney earlier this year.  It is quite thin though, so I had planned to use it to make a full skirt.  I'm concerned a straight dress might be too thin for it (even with a good lining).  But then I also don't love this fabric (I like it, but don't love it, and mostly bought it because it was so cheap), so maybe using it to trial a self drafted pattern is a good way to use it.  And it has a huge width, so even though I only bought 2 metres, there is lots of fabric for both the dress and either a skirt or shirt as well.

I would love to hear your thoughts.  Should I embrace the now and use the blue fabric?  Or should I put this project to the side for a while and instead work on the shirts I'm planning to make from some of my recently purchased Melbourne fabric?

Thursday, August 16, 2012

Keeping warm and cosy (or, a long post about making a dog coat)

The week before I had my accident in April I made a winter coat for Tansy.  I've never made a dog coat, so I started completely from scratch.  First I searched the internet to get an idea of shapes, then I measured Tansy (adding extra centimetres in case her wiggling gave me the wrong measurements!).  I drafted a test pattern and then sewed some scraps of calico together for a toile.

Note to self - Tansy doesn't like new things, so trying to put a calico coat on her was, well, interesting..!  Though it gave me enough of an idea to know what adjustments I needed to make.  I made another toile, had another attempt at fitting a wiggling, squirming dog, made adjustments to the second toile, tried it on her again and I had a pattern I was happy with.

Dog coat pattern piece - cut on centre back fold

My husband and I discussed for a while what sort of closure to make for the coat - it needs two, one at the chest and another at her tummy.  We didn't want to have to wrestle Tansy into it, but we also wanted it to stay on, but to come off easily if she got tangled on something (she loves bounding through bushes and scuffling in undergrowth!).  So we settled on velcro.
It reminds me of a frog!

This coat is a simple cut out from some blue polar fleece.  I thought it looked a bit boring though, so I pulled out some variegated pink-purple yarn from my yarn stash and hand blanket stitched around the edge of the coat.  NEVER AGAIN!!!  Polar fleece is actually quite thick, so pushing a needle large enough for the yarn through the fabric about a zillion times to make the stitches was painful!  It took two evenings and I had very sore fingers!  But I think it was (almost!) worth it, it added a touch of cute to an otherwise plain coat and it made it look sportier.  Tansy is a very sporty and fun dog, so it suits her.


Out for a walk on a sunny, but cold, Canberra day.

Initially Tansy didn't like this weird thing I kept trying to put on her, but we persevered because even though she'd spent the past two winters without a coat, we thought she might actually need one.  Australian Silky Terriers don't have a double coat, which is great for us because it means Tansy doesn't shed hair like most dogs (less to clean up!), but it means she can't keep as warm in winter.  Canberra has lovely winter days (around 13oC/55.4oF) but cold nights and early mornings (regularly -3oC/26.6oF or colder) so Tansy needed a coat. Now she loves it!  I kneel on the floor and she races up to me, puts her front paws on my leg and lifts her head up so I can wrap her in the coat and close the velcro.  I'm really pleased she likes it - she probably doesn't care what it looks like, but she knows it keeps her warm!

It doesn't restrict her movement, so she can still run and explore while wearing it.

January 2013 update: There are more details about this coat at this newer post.


PS:  My shoulder is still giving me problems and I can't do much around the house (including no crafting or gardening) though I am back at work a few hours a week.  It's looking more likely that I'll have to have surgery, so I'll be out of crafting action for a bit longer - possibly not until the new year!

Thursday, March 1, 2012

Great summer shirt

I love this shirt so much!  I based this design from a shirt I bought last year in Manila.  I found the fabric during a chance visit to my local fabric shop in January and even though it isn't the colour I would usually buy I just fell in love with it.  All the seams are french seams and the neckline has binding on the inside.


Fabric: 1.2m @ $12.99/m
Pattern: A couple of hours to draft
Assembling: Once I cut the fabric out (my least favourite part of sewing!) it took a couple of hours for the french seams, an hour to do the manual rolled hem on bottom hem and arms then another hour for my first attempt at binding!

Wednesday, October 5, 2011

To carry and to hold

We've been buying flour in 5kg sacks for a few years.  I saved all the calico sacks with the idea that maybe one day I would be able to do something with them - and now that I can sew I can!  The sacks are very simply constructed with a seam on the bottom and just one side seam (the other side is a fold).  So after washing the sacks I unpicked the two seams, leaving a rectangle of fabric.  Using two of those rectangles I cut a strip off one side of each rectangle to use later as the straps, then sewed the remaining fabric together into a bag and finally attached the straps.  It took about 30 minutes to sew this up.  With the A.C.T ban on plastic bags starting next month now is a good time for us to boost our stash of 'green' bags so I'll be sewing up some more soon.


And another book pouch (or e-book reader holder, or a safe place to keep your stockings and tights while travelling, or a place to hide your chocolate stash, or, well, it can be used for about 101 different things!).  This one is for my husband.  He likes the 'day of the dead' vibe that these kooky owls give.

Saturday, October 1, 2011

Bespoke menswear

Using the pattern I created when I 'fitted' my husband for a shirt for my college assignment a few weeks ago I made a proper shirt for himthis week.  I made the collar a bit shorter and attached short sleeves instead of long sleeves (we are coming into summer here so it was a good excuse to not have to sew cuffs and plackets!).


My husband is really happy with how the shirt feels and I am really happy with how well it fits - and the good fit is what makes it feel so nice to wear!  I love how smooth the fabric is across chest between his shoulders, so many men wear shirts that don't fit properly across there.  Next time you see a man wearing a button up shirt (you'll really notice this if you work in an office) have a look at how his shirt fits.  There are usually lots of 'drag lines' or the armhole seam doesn't sit on the end of their shoulder.  I've really been noticing this a lot lately in meetings and then I get distracted and start thinking about what pattern adjustments need to be made to give the guys I work with a well fitted shirt - what a shame I work in an office instead of a tailors shop! 

Details
Pattern: less than an hour to make the new collar, shorten the sleeves and adjust the shoulders
Cost: fabric, thread and buttons = a bit under $20 (tall men need lots of fabric!!)
Sewing: about 3.5 hours (+ hand sewing on the buttons while watching TV).  I used the buttonhole foot attachment on my sewing machine for the first time.  It worked!

Monday, August 8, 2011

Spring shirt is finished!

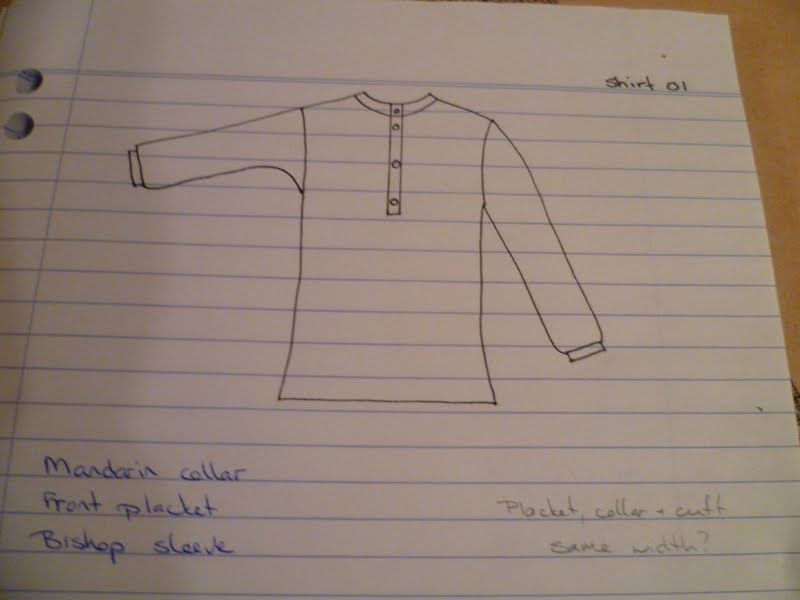
Some of you might remember a little while ago I designed a shirt for spring. Well I finally finished it!  I love it and it looks just how I pictured it (except I haven't put buttons on yet, and now I don't think it needs any).

The design - a shirt with a front placket, bishop sleeves with cuff band and a mandarin/stand collar.

Finished!

A loose fitting, casual shirt.  I think that I will make a couple more of these, now that I have sorted out the pattern details it will be much quicker to sew.

A close up of the placket and cuff - I'm really pleased at how my sewing skills are improving.

Monday, July 18, 2011

A shirt for spring

Last month a light cotton fabric with a lovely print caught my eye.  I bought it thinking that I could make a shirt from it.  

I've finished designing the shirt - well, mostly.  I'm still thinking that I might change the bottom of the shirt by adding a waist band with a couple of buttons at the side.  I made the pattern pieces and cut out the fabric on the weekend.  I'll keep you posted!

Tuesday, July 5, 2011

A cute dress and a crazy parsnip

I wore my self made dress to work again today - I love it!  But it was only 9oC today so I had thick tights and a long sleeved shirt underneath!

A parsnip from our winter garden.

Thursday, June 23, 2011

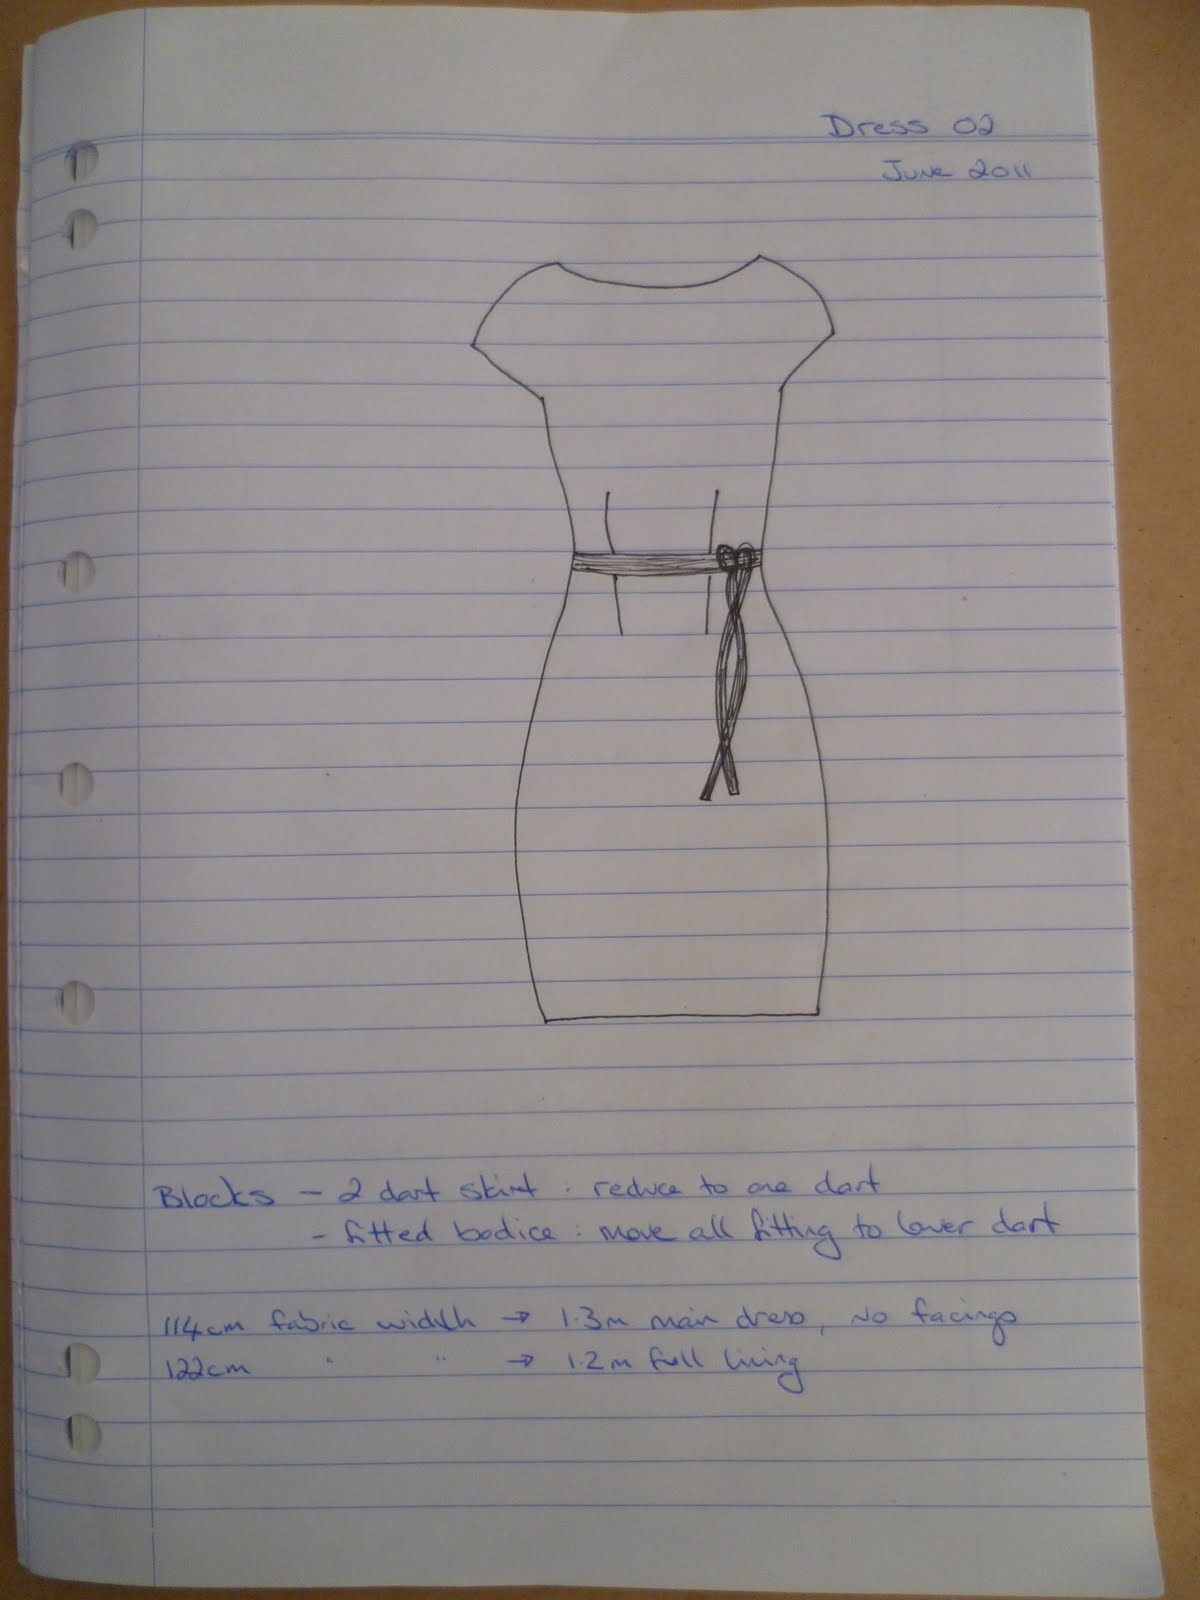
A new dress

Last week I was so inspired by my pattern making assignment where I had to design a dress and make a toile that while I waited for my teacher to mark my assignment I started on another dress.  I finished it last night and hope to wear it soon!

Designed

Pattern pieces.  I made this by connecting bodice pieces to skirt pieces, next time I will try making whole dress pieces.

Dress!  It is fully lined.  A couple of months ago I wouldn't have thought I could make a dress, let alone a fully lined one.  I learnt a lot making this - all things to put into the next item I'll make.  Mostly I learnt that I need more sewing practice (guess that means I have to make some more clothes!!).