Pages

Sunday, October 23, 2011

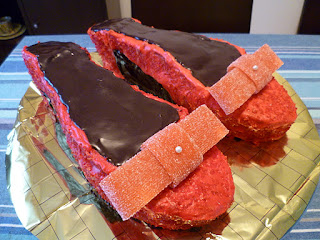
A girl's best friend

Two people, two celebrations, one get-together - hmm, do you make one cake or two?  One of my friends is about to move house, another was having a birthday. 

What about one cake that fits both celebrations?!  Hmm, what kind of cake would do that?

Ruby red slippers of course!

"There's no place like home"...

Every woman should have a great pair of red shoes!

Click your heels together and have a great night out!

Oh my goodness - these took soooo long to make!  I didn't take photos of the process, but I probably should have!  If you are interested in the 'technical aspects' - here they are:
  • I made a slab cake, but if you have a deep square cake tin that would be better.
  • While the cake is cooking prepare your 'shoe' templates - I have fairly small feet, so I traced around a pair of my shoes to get an idea of the shape then I refined the shape, but also made it a bit chunkier so the cake would be stable!
  • Because I used a slab cake, to make high shoes I made a complete shoe template and a half template to stack on top.
  • Then I made the coloured sugar.  I used raw sugar and some red food colouring - I mixed them together in a small bowl and then spread the sugar onto some baking paper to dry.  It worked really well.
  • Once the cake had cooled I cut the shapes.  Icing a cut cake can be a bit tricky because it can be quite crumbly and you end up with cake crumbs all through the icing.  So this time I made a really thin, runny icing to act as a sort of sealant.  As soon as you ice the pieces put them into the fridge to set the icing - otherwise it starts to soak into the cake and makes it really sugary.
  • Once that thin icing layer is set you can stack the pieces and ice them properly.  I coloured the icing using 'pillar box red' and the shoes are (were!) much redder in real life than they appear on my computer screen.  I also flavoured the icing with some Chambord (raspberry liqueur).
  • As I iced with the red icing I stuck on the coloured sugar - it gave it a bit of sparkle and also added a nice texture.
  • I used chocolate ganache to help define the shoes.
  • To make the bows I used some sour strap lollies - just folded them over and stuck a (washed and clean!) pearl headed pin from my sewing stash to hold them together.  Make sure you take the pins out before serving the cake!!
  • And the finishing touch was the yellow brick road - some wrapping paper with bricks drawn on.

I hope this gives someone some help and inspiration if they decide to venture into Oz!

Wednesday, October 5, 2011

To carry and to hold

We've been buying flour in 5kg sacks for a few years.  I saved all the calico sacks with the idea that maybe one day I would be able to do something with them - and now that I can sew I can!  The sacks are very simply constructed with a seam on the bottom and just one side seam (the other side is a fold).  So after washing the sacks I unpicked the two seams, leaving a rectangle of fabric.  Using two of those rectangles I cut a strip off one side of each rectangle to use later as the straps, then sewed the remaining fabric together into a bag and finally attached the straps.  It took about 30 minutes to sew this up.  With the A.C.T ban on plastic bags starting next month now is a good time for us to boost our stash of 'green' bags so I'll be sewing up some more soon.


And another book pouch (or e-book reader holder, or a safe place to keep your stockings and tights while travelling, or a place to hide your chocolate stash, or, well, it can be used for about 101 different things!).  This one is for my husband.  He likes the 'day of the dead' vibe that these kooky owls give.

Monday, October 3, 2011

Can you spot the odd one out?


I think one of the chooks sneezed unexpectedly...

Have you seen anything surprising lately? 

Saturday, October 1, 2011

Bespoke menswear

Using the pattern I created when I 'fitted' my husband for a shirt for my college assignment a few weeks ago I made a proper shirt for himthis week.  I made the collar a bit shorter and attached short sleeves instead of long sleeves (we are coming into summer here so it was a good excuse to not have to sew cuffs and plackets!).


My husband is really happy with how the shirt feels and I am really happy with how well it fits - and the good fit is what makes it feel so nice to wear!  I love how smooth the fabric is across chest between his shoulders, so many men wear shirts that don't fit properly across there.  Next time you see a man wearing a button up shirt (you'll really notice this if you work in an office) have a look at how his shirt fits.  There are usually lots of 'drag lines' or the armhole seam doesn't sit on the end of their shoulder.  I've really been noticing this a lot lately in meetings and then I get distracted and start thinking about what pattern adjustments need to be made to give the guys I work with a well fitted shirt - what a shame I work in an office instead of a tailors shop! 

Details
Pattern: less than an hour to make the new collar, shorten the sleeves and adjust the shoulders
Cost: fabric, thread and buttons = a bit under $20 (tall men need lots of fabric!!)
Sewing: about 3.5 hours (+ hand sewing on the buttons while watching TV).  I used the buttonhole foot attachment on my sewing machine for the first time.  It worked!