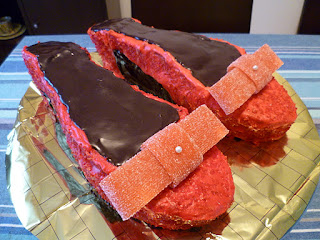
What about one cake that fits both celebrations?! Hmm, what kind of cake would do that?
Ruby red slippers of course!
"There's no place like home"...
Every woman should have a great pair of red shoes!
Click your heels together and have a great night out!
Oh my goodness - these took soooo long to make! I didn't take photos of the process, but I probably should have! If you are interested in the 'technical aspects' - here they are:
- I made a slab cake, but if you have a deep square cake tin that would be better.
- While the cake is cooking prepare your 'shoe' templates - I have fairly small feet, so I traced around a pair of my shoes to get an idea of the shape then I refined the shape, but also made it a bit chunkier so the cake would be stable!
- Because I used a slab cake, to make high shoes I made a complete shoe template and a half template to stack on top.
- Then I made the coloured sugar. I used raw sugar and some red food colouring - I mixed them together in a small bowl and then spread the sugar onto some baking paper to dry. It worked really well.
- Once the cake had cooled I cut the shapes. Icing a cut cake can be a bit tricky because it can be quite crumbly and you end up with cake crumbs all through the icing. So this time I made a really thin, runny icing to act as a sort of sealant. As soon as you ice the pieces put them into the fridge to set the icing - otherwise it starts to soak into the cake and makes it really sugary.
- Once that thin icing layer is set you can stack the pieces and ice them properly. I coloured the icing using 'pillar box red' and the shoes are (were!) much redder in real life than they appear on my computer screen. I also flavoured the icing with some Chambord (raspberry liqueur).
- As I iced with the red icing I stuck on the coloured sugar - it gave it a bit of sparkle and also added a nice texture.
- I used chocolate ganache to help define the shoes.
- To make the bows I used some sour strap lollies - just folded them over and stuck a (washed and clean!) pearl headed pin from my sewing stash to hold them together. Make sure you take the pins out before serving the cake!!
- And the finishing touch was the yellow brick road - some wrapping paper with bricks drawn on.
I hope this gives someone some help and inspiration if they decide to venture into Oz!


This was the MOST AMAZING cake ever!!! i felt so so special!! Thank you!!! It tasted as good as it looks too. I bow before the cake queen!
ReplyDelete