Pages

Tuesday, January 29, 2013

The pleasure (and perils!) of the post

A small package arrived for me today containing...  a small haul of Vogue patterns!  A couple of weeks ago I was looking on the internet for men's coat and jacket patterns (they are few and far between and you won't see one in this post either!) when I saw that Vogue patterns was having a sale of USD3.99 per pattern.  With the strong AUD I was very easily tempted! 

Being new to sewing and also enjoying the challenge of drafting my own patterns I haven't bought very many patterns, so this purchase single handedly more than doubled my stash!  I found the sizing a bit confusing as many patterns used different size ranges.  Being quite a pear shape I had to make a couple of decisions on choosing patterns based on bust or hip measurement.  In the end I decided that when in doubt - size up! 

So here is what I ended up buying.   (By the way, postage to Australia from the USA was more than the cost of all these patterns combined but for the discount in pattern price it was still worth it).

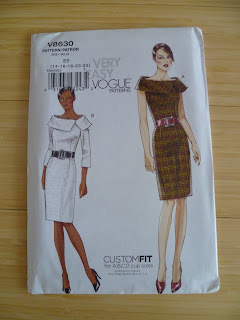
 V8630 - A simple dress with a large fold over collar.  A 'Very Easy Vogue', though apparently not recommended for pear shapes...

 V8312 - Some pattern love for my puppy!  I've made a couple of simple coats for Tansy, but I like that this has sleeves (legs?).  She's only 3 years old, but Tansy has developed quite bad arthritis in one of her legs.  I'm hoping that a coat with legs will keep her extra cosy and help ease her arthritis pain in the winter cold.
 
  V8333 - What was I thinking?!  A beautiful but 'Advanced' (!) jacket pattern. 

 V2787, V1044 and V8811 - Pretty vintage dress reprints. 

I love the bodice detail in the V1044.

My favourites are the jacket V8333 and the vintage dress V1044.  Hopefully you'll see one of these here soon as a finished object - but don't hold your breath!

Wednesday, January 23, 2013

Seasonally inappropriate sewing

I could have also titled this post 'Getting Well Part 3' - yes, another month another operation in our little household.  This time it was my husband, he is in pain, but recovering.  And I swear that 2013 will be a much better health year for us than 2012 was! (I count this operation as being needed from 2012, and therefore nothing to do with 2013!). 

Having to do increased household and nursing duties has reduced my time for sewing though.  So I only have one small finished item to show this week.

This reversible double sided dog coat was on my cutting table last April when I had my accident so Tansy didn't have it in time for last winter, but she will be all set for walks on Canberra's icy winter mornings this year (though in the summer heat it is hard to believe those days are only a few short months away).  This coat a followup from the coat I made her last year. 


 The basic pattern - cut centre back on the fold (the straight line at the bottom of the photo).  
Tansy is an over sized (not overweight) Australian Silky Terrier.  She weighs around 8kg.
This pattern piece measures:
36cm along centre back length from neck to tail
27cm around her side from centre back to centre tummy, this includes ease for the Velcro fastening
14.5cm torso, from the back of her front legs to the front of her back legs.

This pattern does not include any seam or hem allowance as I used non-fraying polar fleece for Tansy's first coat.  If you want to make a double layer coat, or are using a fabric that might fray, don't forget to add seam allowance.

 One side of the coat.  I know putting a dog in leopard print is a bit naff, but I couldn't help myself - when I saw the fabric I just had to buy it...!
If you want to make a double sided coat, sew the right sides of the fabric together except for part of the neck area (the curve at the bottom of the photo).  Pull the coat right side out through the unsewn neck area, then stitch the neck area closed.  Add Velcro (or your preferred fastener) and you're done!

 
 Other side of the coat, blue polar fleece.  Because I have used Velcro as the fastener the coat is fully reversible.

 I'm sure the RSPCA would be knocking at my door if I tried to get Tansy to model a thick double sided coat on a hot summer day, so her toy 'Emu' offered her services. 

Friday, January 18, 2013

Refreshments for the heat

Today is the 10th anniversary of the devastating Canberra bushfires, that killed 4 people and destroyed around 500 homes.  The heat and dryness of the past couple of weeks has lead to conditions almost identical to those in the lead up to the 2003 fires.  Understandably some people are very nervous.  Today is another hot day with the temperature predicted to reach 39oC (102oF).  Last week I heard numerous helicopters overhead but none the past few days so I'm taking that as a good sign (they are spotting for fires in the National Parks around Canberra, there have been several small fires near Canberra and the smell of smoke was in the air).

I'm beating the heat today by staying inside with the curtains closed against the sun and making rhubarb cordial so I can have delicious drinks later this afternoon.  While thinking about writing this post I searched 'cordial' on the internet and was quite surprised to find that what I call cordial (as an Australian) isn't what other parts of the world call it!  So to clarify, this rhubarb cordial is a non-alcoholic fruit based drink mixer - it is best mixed with still water, soda water or tonic water.  My personal preference is cold soda water (and maybe a splash of Bacardi or vodka!).

We have three rhubarb plants but I must admit that while I don't mind rhubarb, I'm not a huge fan.  My favourite way to eat it is in a rhubarb and apple crumble, which is best eaten in winter - when the rhubarb is dormant!  So last summer we started making rhubarb cordial.  It is fruity and a little bit tart, so it is quite a refreshing way to use our crop.  This recipe is one I created by mixing up a few recipes I read on the internet and in magazines.

I'm not sure what variety of rhubarb we have, but it is quite green.

Ingredients:
400g rhubarb stems, chopped into about 3-4cm pieces
300g caster sugar
1 lemon, juiced
1 litre water
1 tablespoon citric acid
 (Double the recipe if you have lots of rhubarb)

Method:
Place the chopped rhubarb, sugar, lemon juice, lemon halves and water into a saucepan.  Stir to combine.
Place saucepan on medium heat, without lid.  Stir occasionally to ensure the sugar dissolves.  When mix comes to the boil, reduce heat to a simmer.  Continue to stir occasionally.  Simmer until the rhubarb is mushy.
Remove from heat and leave to cool for a couple of hours.
Push the mix through a strainer to separate the stewed rhubarb from the liquid.
Put stewed rhubarb into a clean container, remove lemon halves and place into fridge, eat within 3 days.
Whisk citric acid into the cordial.  Pour into sterilized jars or bottles.  Place cordial into fridge and drink within 2-3 weeks.  Makes about 1 litre of cordial.

This is not as concentrated as shop bought cordials, so you dilute it 1 part cordial to about 3-4 parts water.  It is also quite cloudy from the sediment of the stewed rhubarb.  I have tried a recipe where you didn't cook the rhubarb, just let it sit for 24 hours.  That recipe gave a clear cordial, but I didn't think it was as tasty.

You can eat the leftover stewed rhubarb, it is quite nice with a dollop of thick cream!  Just remember a lot of the rhubarb flavour is now in the cordial, so it is a muted rhubarb taste.

Everything in the saucepan, ready to cook.
 
 Mushy rhubarb!
 Freshly bottled rhubarb cordial ready to go into the fridge.

Sunday, January 13, 2013

Bags of room

My shoulder seems to be improving quite well, so if I'm careful I can sew in lots of short bursts (with breaks in between), meaning I have been sewing more in the past week than I have in the past six months!  I have two finished items this week - a shopping bag and a casual shirt.

 Shopping bag made from a vintage seed packet print cotton drill.  It's already been used twice since I made it earlier this week.

 Casual, dartless shirt for summer.  I used the same pattern I drafted back in 2011 for a shirt, but added a full length front button placket.  Technically this shirt isn't finished as I have to hand sew the buttons on, but I'm not sure if my shoulder is up for hand sewing just yet.  It is also much bigger on me than the other shirt I made using this base pattern, not sure why...  It is so big I think I'm going to add some waist darts to reduce the shirt billowing quite so much.

 The back seam - this is the shirt I cut in two pieces instead of on the fold.  In the end I just sewed a small (6mm) back seam and the pattern almost matches.  Yes, even with that extra seam the shirt is still too big!

Close up of the button placket (minus button holes and buttons!).  The fabric is a light cotton, with an almost seersucker type texture, bought in Cleggs (Melbourne) last year.

My next plans are to finally finish the 'Blue Dress' and I'm starting an ambitious long-term plan of making a jacket for my husband.  I'm basing it off a jacket in the Burda Magazine (01/2013) I received recently and we will adapt it into something more my husband's style.  I've traced the basic pattern but am expecting to have to make lots of fit changes before we can even think of changing the style, so it is definitely a long-term project!

Monday, January 7, 2013

Sunshine and lanterns

Yesterday I braved the outdoors to take a few garden photos, they were taken in the early morning before the scorching sun made all the plants droop (thankfully a cool change is expected on Sunday).

The tall plant on the right is a dill that just grew there (self seeded from a plant last year).  We used some of the leaves, but now the plant is covered in drying seeds - does anyone have any tips for using dill seeds?   The garden bed on the left wasn't supposed to be so jungle like, but a heap of tomatoes and potatoes self seeded from last year and we just left them to grow.  (Most of our 40kg potato harvest last year came from that bed so I guess it was inevitable that some strays would come up this year!).

 
The elderflower is still flowering.  We used some of the flowers a few weeks ago to make elderflower champagne, we used the River Cottage recipe.  We drank some on New Years Eve, what can I say - it wasn't bad, but I think I prefer the cordial we made last year!

 Cute stripey eggplants.

Interesting lantern like tomatillo fruit.  Apparently you wait until the 'lanterns' turn brown and dry and then you pick the fruit..?!  Has anyone else grown these before?

Saturday, January 5, 2013

Glitches

Oh dear, I've encountered a couple of glitches in my reinvigorated sewing plans - just as I was starting to get back into the swing of things (and using up some of my stash!).

Firstly, when I was cutting out a new shirt I mistakenly cut the back piece out as a pair of halves instead of one piece on the fold!  It was even a pattern I drafted myself so there really is no excuse!  Unfortunately I don't have enough fabric to recut the back and I'm using a print fabric so I can't add an extra panel to make up the couple of centimetres I need without having a double jump in the pattern.  I'm wondering if I can just use a small seam allowance and just sew up the back - that will muck up the collar piece though and may give a tight fit across the back...  A sewing dilemma!

Then the 'reverse' function on my sewing machine stopped working.  When I hold it down instead of sewing in reverse the machine just keeps stitching forward.  So it was dropped off at the sewing machine doctor this morning, I'm hoping for just a short stay there but it may be up to a week.

And finally - OK, this one is not strictly related to sewing but it certainly is affecting my general enthusiasm for things at the moment - the weather is really hot.  Our vegetable garden is looking very sad at the moment and we are hoping our summer crop isn't affected too badly.  We've had several days of heat, today it reached 40oC (104oF) and we have at least another week of above average temperatures.  The heatwave has been sweeping across much of Australia this week and has even led to severe fires in Tassie

I hope you are all safe and still relaxing from the holidays.

I can't leave you without a photo, so here is one I took a couple of months ago - some of our homegrown garlic drying out under the old pergola.

Thursday, January 3, 2013

'Quick' sewing fix

Over the past couple of days I've been sewing a Burda Style Light Cowl Top.  The instructions in the latest Burda Style magazine says it takes 1 hour to make...  Hmm, it took me a lot more than that!  Though in my defence I'm out of practise (cue unpicker!), have to take lots of breaks to rest my shoulder and, well, Burda Style instructions are a bit vague! 

Anyway, here it is - being modelled beautifully by my brand new dress form (a Singer 150, received as a present from my very thoughtful husband).

A very boxy shape.  I also don't really like the cowl afterall.  My husband thinks it looks quite nice on me though so maybe I am being a bit harsh!

I much prefer it with a skinny belt to give it shape (though maybe not orange..!).

Details:
Pattern:  Burda Style Magazine 1/2013, pattern 123a
Adjustments: Shortened the length by about 6cm
Cost: $7 for fabric, plus thread from my stash
Did I learn anything new: I used the 'overcast' foot on my sewing machine to finish some edges
Would I recommend it:  There is just the front and back pieces to sew together so it is really quite easy, though the cowl and back neck binding add a bit of sewing interest
Would I make it again:  Hmm, maybe without the cowl and include some waist shaping for a simple shirt
Where will I wear it:  Around the house and to the local shop, but probably not to work because I just don't like the cowl!